Showing posts with label Cards. Show all posts

Tuesday, August 8, 2023

Designer Tags Dies - Online Exclusive

Did you know the Designer Tags Dies are still available?  They are!! 

You can find them in the Online Exclusives section of my online store!

Designer Tags Dies (159165)
Images copyright Stampin' Up! 1999-2023


Here's are a couple of  beautiful tags created with the set.
Designer Tags Dies (159165)
Images copyright Stampin' Up! 1999-2023


I used this awesome die set in a card class in the past.  Here are the cards from the class.  

Although the Designer Series Paper is from a retired pack, you can substitute any paper and use coordinating cardstock colors to easily recreate these cards.

Designer Tags Dies (159165)
Colors:  Crushed Curry, Granny Apple Green, Gorgeous Grape

Designer Tags Dies (159165)
Colors:  Misty Moonlight, Granny Apple Green, Real Red

To get your Designer Tags Die Set, go here:  DESIGNER TAGS DIES

To see all of the Online Exclusive Products, go here:  ONLINE EXCLUSIVES


Tuesday, July 18, 2023

All Bundled Up Fun-Fold Slimline Card

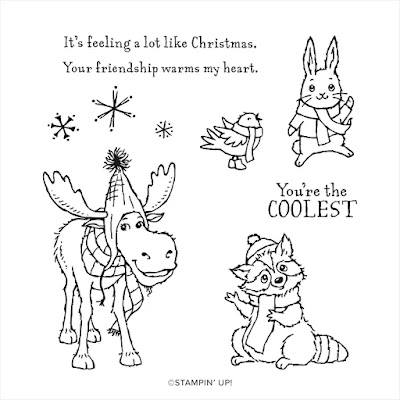
The clearance rack was recently updated, and the adorable All Bundled Up Stamp Set is now available at a discount.  Here's a look at the stamp set.  

All Bundled Up Stamp Set (159834)
Images copyright Stampin' Up! 1990-2023

It's on the CLEARANCE RACK for just $16.00!!! 

You can see it here:  ALL BUNDLED UP STAMP SET

A Cute Fun-Fold Card

Here's an adorable slimline card created using the set.  Some of the products used are now retired, but you can easily recreate with other colors, greetings and embellishments!

All Bundled Up Stamp Set (159834)

The front features a fun, fold-out where two more of the adorable animals are hiding!  It's layered on Mint Macaron (retired) and has a Fresh Freesia card base.

It's hard to see behind the bow, but there's a little round tab on the left-hand side (you'll see a 1/2 circle from the front), to pull the card front open to reveal the additional panels.

All Bundled Up Stamp Set (159834)

The images were stamped first, and then the surrounding areas were lightly colored using a Blending Brush to give them a soft, halo effect.  You can see them here:  BLENDING BRUSHES

Blending Brushes (153611)
Images copyright Stampin' Up! 1990-2023

The images were colored using Stampin' Blends alcohol markers.  You can see all the colors available here:  STAMPIN' BLENDS

And, don't forget about the inside of the card! 

All Bundled Up Stamp Set (159834)

Measurements

  • Fresh Freesia Card Base - 6 1/2" long X 6 1/4" tall - Score long side at 3 1/4"
  • Mint Macaron Layer - 3" x 4 1/4"
  • Basic White Layer (inside) - 3" x 6"
  • Basic White Folded Layer (front) - 8 1/4 long by 4" tall
    • Score long side at 2 3/4" and 5 1/2"
  • Ribbon - 16"

Hope you found some inspiration in this project sample -- Happy Stamping!!!


Thursday, July 13, 2023

Artistically Inked + Color Coach Project Sample Tutorial

In a previous post, I shared how to choose colors using the Color Coach.  In that post, you saw bits and pieces of a card made using the Lost Lagoon Color Coach.  Here's the whole picture -  a cute card that really comes together quickly too!  Check out the free detailed tutorial below.

Artistically Inked Stamp Set (154542) and Artistic Dies (155371)

Here's a look at the Color Coach for Lost Lagoon

Stampin' Up! 2023 Color Coach
Images Copyright Stampin' Up! 1999-2023

This card uses Lost Lagoon, along with Berry Burst and Blackberry Bliss - some of my favorite colors!

Stampin' Up! 2023 Color Coach
Images Copyright Stampin' Up! 1999-2023

This card features the combination of the Artistically Inked Stamp Set (154542), along with the coordinating Artistic Dies (155371).

Artistically Inked Stamp Set (154542)
Images Copyright Stampin' Up! 1999-2023
  
Artistic Dies (155371)
Images Copyright Stampin' Up! 1999-2023

Recreate this Card

Supplies Needed

Stamps
  • Artistically Inked
Ink
  • Blackberry Bliss
Cardstock & Paper
  • Basic White
  • Berry Burst
  • Blackberry Bliss
  • Lost Lagoon
  • Bright & Beautiful Designer Series Paper
Tools
  • Artistic Dies
  • Blackberry Bliss Stampin' Blends
  • Stampin' Cut & Emboss Machine

Adhesives
  • Stampin' Seal
  • Stampin' Dimensionals
  • Multipurpose Liquid Glue

Embellishments
  • Rhinestone Basic Jewels 

Steps

Cut Cardstock and Paper Pieces

  • Basic White
    • 5 1/2" x 8 1/2" card base; score long side at 4 1/4", fold and crease with bone folder 
    • 3" x 1/2" - for greeting
  • Berry Burst - 3 1/8" x 3/4" for greeting layer
  • Blackberry Bliss
    • 1" x 1" for die cutting flower center
    • 3 3/8" x 1" for greeting layer
  • Lost Lagoon – 3 1/8” x 5/8” for greeting layer
  • Bright & Beautiful Designer Series Paper (DSP)
    • Lost Lagoon colored piece - 5" x 3 1/2" for die cutting leaves
    • Berry Burst colored piece - 3" x 3" for die cutting flower
Die Cut
  • Using Artistic Dies
    • Cut leaves from Lost Lagoon colored DSP
    • Cut Flower from Berry Burst colored DSP
    • Cut Flower center from Blackberry Bliss Cardstock
Stamp
  • Using Artistically Inked stamp set + Blackberry Bliss Ink
    • Stamp the corners of the card base, as shown in picture
    • Stamp greeting on Basic White piece

Color

  • Using Blackberry Bliss Stampin' Blends, color three Rhinestone Basic Jewels

Assemble

  • Using Multipurpose Liquid Glue
    • Adhere die cut leaves to card front
  • Using Stampin’ Seal Adhesive
    • Adhere stamped greeting to layers as shown - Lost Lagoon, Berry Burst, then Blackberry Bliss
    • Adhere Blackberry Bliss die cut flower center to die cut flower
  • Using Stampin' Dimensionals
    • Adhere flower to card front
    • Adhere assembled greeting to lower portion of card front.

Embellish

  • Add Blackberry Bliss colored Rhinestone Basic Jewels to card front

Share

  • Sign, insert in envelope and mail (or hand-deliver) to someone special!


Now your done!  Be sure to send it to someone special today!

For a complete list of products used go here:  PRODUCTS USED

Tuesday, June 20, 2023

Botanical Layers Folder Card using 2023-2025 In Color Collection

Botanical Layers Stamp Set and Meadow Dies

With each new Annual Catalog launch, I like to send my customers a special mailing.  

When the new 2023-24 Annual Catalog launched, I sent my customers this special card -- it's a Folder Card, with a pocket inside! 

Botanical Layers Stamp Set and Meadow Dies

I loved how it turned out, and wanted to share, with you, how to make one.  Follow the steps outlined below, and you can easily recreate this adorable Folder Card for someone special.

Supplies Needed

Stamps
  • Botanical Layers
Ink
  • Boho Blue
  • Momento Tuxedo Black
Cardstock
  • Basic White
  • Boho Blue
  • Copper Clay
  • Moody Mauve
  • Pebbled Path,
  • Wild Wheat
Tools
  • Meadow Dies
  • Basic Borders Dies
  • Double Oval Punch
  • Natural Prints Dies
Embellishments
  • Boho Blue Textured Ribbon
Here's a link for all the supplies:  BOTANICAL LAYERS FOLDER CARD

Botanical Layers Stamp Set and Meadow Dies  Botanical Layers Stamp Set and Meadow Dies

Steps

Cut Cardstock and Paper Pieces

  • Basic White
    • Use a full sheet of 8 ½” x 11” cardstock for card base
      •  Score long side at 5 ½”, fold and crease with bone folder to form a 5 ½” x 8 ½” card base
    •  5 ½” x 4 ¼” for inside pocket
      • Mark the left, short side at 3 ½” and cut a diagonal line from the mark to the top of the opposite side.
    • 4 ¼” x 5 ½” for die cut card front layer
    • 1 ½” x 3” for die cut greeting label
  • Boho Blue
    • 1” x 1 ¼” for die cutting butterfly
    • 1 ½” x 2 ½” for punching scalloped oval layer for greeting
  • Copper Clay– 1 ½” x 5” for die cutting
  • Moody Mauve– 2” x 5” for die cutting
  • Pebbled Path– 1 ½” x 5 ½” for die cutting
  • Wild Wheat– 1” x 5 ½” for die cutting
Die Cut
  • Basic White layer using Basic Borders Dies
    • Cut on one long edge only.
  • Basic White Greeting label using Natural Prints Dies
  • Boho Blue (1” x 1 ¼”) piece using Meadow Dies to cut butterfly
  • Copper Clay, Moody Mauve, Pebbled Path and Wild Wheat using Meadow Dies
Punch
  • Boho Blue (1 ½” x 2 ½”) piece using the scalloped oval from the Double Oval Punch
Stamp
  • Using Botanical Layers stamp set + Boho Blue Ink
    • TIP:  CREATE A STAMPED BACKGROUND -- Stamp the Basic White card base by stamping around the outside edge, starting on the short edge, in a “U” shape (ie. Start along a short edge and finish on the opposite short edge)
    • Stamp another “U” shaped row, along the inside of the previously stamped row.
    • Stamp around the outside edge of the Basic White pocket piece (for inside)
  • Using Botanical Layers stamp set and Tuxedo Black Ink
    • Stamp the Basic White die cut greeting label

Assemble

  • Using Stampin’ Seal Adhesive
    • Adhere die cut Basic White layer to the right side of card front, centered along the edge
  • Using Multipurpose Liquid Glue
    • Adhere die cut floral shapes to Basic White die-cut layer on card front
  • Using Tear & Tape
    • Test fit your pocket to the inside of card to be sure it will close correctly; trim any excess if needed from a short edge
    •  Adhere the inside pocket to inside of card along the right and bottom edges only
  • For Greeting
    • TIP - "EXTEND" THE PUNCHED SHAPE -- Cut the punched Boho Blue scalloped oval in half along the length
    • Adhere one half of scalloped oval to top, back, portion of die cut greeting, and the other half to the bottom, back, portion of die cut greeting
    • Adhere assembled greeting to card front using dimensionals
  • For Butterfly
    • TIP - ADD DIMENSION -- Gently curve the wings backwards using a bone folder
    • Adhere butterfly to card front with a mini dimensional

Embellish

  • Add ribbon
    • Adhere a 2” strip of ribbon to the left center of card front, tucking the edge just under the Basic White die cut layer
    • Trim any excess ribbon from the left side of card

Share

  • Insert whatever goodies you want to send in the pocket
  • Sign, insert in envelope and mail (or hand-deliver) to someone special!


Botanical Layers Stamp Set and Meadow Dies

Tuesday, February 7, 2023

Sale-A-Braton! Favored Flowers Designer Series Pape

 There are several Designer Series Paper (DSP) packs you can earn free with a qualifying purchase during Sale-A-Bration! (SAB) -- now through Feb 28, 2023.  Here's a look at one of them, along with project samples shown in the Sale-a-bration! Brochure and coordinating products you can get as well.  

Favored Flowers 12"x12" DSP

Favored Flowers DSP (160833) - Images copyright Stampin' Up! 1999-2023

Favored Flowers DSP (160833)
Favored Flowers DSP (160833) - Images copyright Stampin' Up! 1999-2023

Coordinating Products

Fragrant Flowers Bundle (C-160460) (P-162379) - Images copyright Stampin' Up! 1999-2023

This bundle is available in Cling Mount (160460) OR Photopolymer (162379).

Plus, if you purchase the coordinating bundle shown above and an additional $1.50 in merchandise, you can get the DSP FREE now through Feb 28, 2023! 

Evening Evergreen Open Weave Ribbon (155573)
Images copyright Stampin' Up! 1999-2023

The Evening Evergreen Open Weave Ribbon (155573) goes beautifully with this paper.  (See the sample image to the right side above.)

Video

Check out this video for a look at all of the DSP available during SAB: DSP VIDEO

Shop Now

Download your Sale-a-bration! Brochure here:  SAB BROCHURE

Shop now and get your free DSP with a qualifying purchase:  SHOW NOW


Tuesday, January 31, 2023

Sale-A-Bration! Day At The Farm Designer Series Paper

 There are several Designer Series Paper (DSP) packs you can earn free with a qualifying purchase during Sale-A-Bration! (SAB) -- now through Feb 28, 2023.  Here's a look at one of them, along with project samples shown in the Sale-a-bration! Brochure and coordinating products you can get as well.  

Day at the Farm 12"x12" DSP

Day At The Farm DSP (160835)
Day At The Farm DSP (160835) - Images Copyright Stampin' Up! 1999-2023

Day At The Farm DSP (160835)
Day At The Farm DSP (160835) - Images Copyright Stampin' Up! 1999-2023


Coordinating Products

On The Farm Bundle (160661) - Images copyright Stampin' Up! 1999-2023


Plus, if you purchase the coordinating bundle shown above, you can get the DSP FREE now through Feb 28, 2023!

Videos

Check out this short video for an up close look at the DSP: DAY AT THE FARM DSP VIDEO

Check out this video for a look at all of the DSP available during SAB: DSP VIDEO

Free Card Class - Today's the Last Day!!

PLUS -- get a free Adorable Owls Card Class with a qualifying order now through January 31, 2023. Visit this blog post for more details: ADORABLE OWLS CARD CLASS

Shop Now

Download your Sale-a-bration! Brochure here:  SAB BROCHURE

Shop now and get your free DSP with a qualifying purchase:  SHOW NOW

Tuesday, January 24, 2023

Sale-A-Bration! Dainty Flowers Designer Series Paper

There are several Designer Series Paper (DSP) packs you can earn free with a qualifying purchase during Sale-A-Bration! (SAB) -- now through Feb 28, 2023.  Here's a look at one of them, along with project samples shown in the Sale-a-bration! Brochure and coordinating products you can get as well.  

Dainty Flowers 12"x12" DSP

Dainty Flowers Designer Series Paper  - 160834
Dainty Flowers DSP (160834) - Images copyright Stampin' Up! 1999-2023
 
Dainty Flowers Designer Series Paper  - 160834
Dainty Flowers DSP (160834) - Images copyright Stampin' Up! 1999-2023

Coordinating Products

Dainty Delight Bundle - 160675
Dainty Delight Bundle 160675 - Images copyright Stampin' Up! 1999-2023

Plus, if you purchase the coordinating bundle shown above, you can get the DSP FREE now through Feb 28, 2023!

Videos

Check out this short video for an up close look at the DSP: DAINTY FLOWERS DSP VIDEO

Check out this video for a look at all of the DSP available during SAB: DSP VIDEO

Free Card Class

PLUS -- get a free Adorable Owls Card Class with a qualifying order now through January 31, 2023. Visit this blog post for more details: ADORABLE OWLS CARD CLASS

Shop Now

Download your Sale-a-bration! Brochure here:  SAB BROCHURE

Shop now and get your free DSP with a qualifying purchase:  SHOW NOW

Friday, January 6, 2023

January 2023 Adorable Owls Card Class


Adorable Owls Stamp Set (160269)

Now through January 31, 2023, you can get my Adorable Owls card class free with a minimum $50 order. 

The Craft Pack for this class includes supplies to complete 6 cards, 2 each of  3 designs.

Craft Pack includes:
  • Cardstock and Designer Series Paper
  • Pre-cut punched and/or die-cut images
  • Embellishments
  • Envelopes
  • Detailed Tutorials with complete supply list
  • Stamps, inks, coloring tools and adhesives are NOT included

Note, supplies for the exact cards shown are limited to first come first served.  Alternate designs from the same DSP pack, or similar embellishment will be substituted when current supply is gone.  (Some items are now retired.)

Here's an up close look at each card, along with a detailed supply list. 


 Here is the supply list for the entire class (all 3 card designs):  CLASS SUPPLY LIST

Get your free Class Craft Pack (US Addresses Only)

 Here's how to get your free class Craft Pack:

  1. Visit my online store at https://cathymyers.stampinup.net/
  2. Choose me as your demonstrator - Cathy Myers
  3. Add a min. $50 in product to your online cart (before tax and shipping).
  4. Select your FREE Sale-a-bration! item -- Choose the Adorable Owls Stamp Set (160269) to make the cards as shown, or choose another item and substitute.
  5. Apply the January Host Code to the order -- DXFKGVMJ.
  6. Complete the order and submit your payment.
I'll be automatically mailing the card class to the address used for your order (US Only).  That's it!!

If you'd prefer, I can place your order for you.  Just email your shopping list and contact information to me at papercraftpoint@gmail.com

Thursday, January 5, 2023

Saying Thanks Kit - Product #162361

 Say thank you to the people who make your day, every day with Saying Thanks all-inclusive card kit!

  • This kit has everything you need to show appreciation to family and friends who light up your life!
  • Make nine bright, colorful cards in no time to say thank you, recognize friends, and share your gratitude with a bright watercolor wash that won’t go unnoticed!
  • You’ll never miss an opportunity to express gratitude with this colorful kit!
Saying Thanks Kit

Kit Includes:

  • Enough supplies to create 9 cards—3 each of 3 designs—and 9 coordinating envelopes.
  • Printed die-cut words, precut pieces, and enough adhesive to complete projects.
  • White baker's twine and iridescent diamond sequins.
  • Finished card size: 5-1/2" x 4-1/4" (14 x 10.8 cm).
  • Coordinating colors: Basic Black, Daffodil Delight, Gorgeous Grape, Granny Apple Green, Poppy Parade, Tahitian Tide.
Saying Thanks Kit

Video

Checkout the unboxing/crafting video for this kit:  VIDEO

Get yours now

Visit the Kit Collections section of my online store and order yours today: 
KITS COLLECTION


Thursday, December 15, 2022

Cupcake from Full Basket Dies

To celebrate National Cupcake Day, I've created a cupcake card!

Full Basket Dies

This cupcake card showcases an alternate use for the Full Basket Dies (158679).

Full Basket Dies
Images copyright Stampin' Up! 1990-current


For this card, the die intended to cut out the hearts stamped with the Cheerful Basket stamp set (158674) is used to create the cupcake frosting!

Cheerful Basket Stamp Set
Images copyright Stampin' Up! 1990-current

And the dies for creating the basket are used to create the cupcake itself.

(By the way, the Stamp Set and Dies mentioned above are currently available at a discounted bundle price - Cheerful Basket Bundle (158680))

Recreate this Card

For the Frosting

  1. Die cut two of the "frosting" pieces from Soft Suede.  Aka the piece designed to cut out the stamped hearts.
  2. Flip one over, and adhere them together so that one is above the other (See picture) and trim any excess if needed.

For the Cupcake

  1. Die cut the solid "basket" image in Parakeet Party.
  2. Die cut the "woodgrain" image from the Tea Boutique Designer Series Paper (DSP).
  3. Adhere the DSP to the basket image.

Assemble the Card

  1. Create a Crumb Cake card base.
  2. Stamp the greeting on the Tea Boutique DSP.
  3. Adhere the DSP to the card base.
  4. Adhere the cupcake to the center of the card front with dimensionals.
  5. Add a baker's twine bow.
  6. Add 2022-24 In Color Matte Decorative Dots to the frosting for sprinkles.
  7. Add Wink of Stella to the stamped greeting for a little shimmer.
Now your done!  Be sure to send it to someone special today!

For a complete list of products used go here:  PRODUCTS USED

Wednesday, October 5, 2022

Hand-penned Petals Cards - Creating a Neutral Background Technique

Did you catch the Stampin' Up! Virtual Crafting Event on World Card Making Day?  If you missed it, or maybe you want to watch it again, it's available for a limited time via the link below.

WORLD CARD MAKING DAY VIRTUAL EVENT


During the event, a project was completed using the Cottage Rose Bundle.   

 COTTAGE ROSE BUNDLE

Cottage Rose Bundle
Copyright Stampin' Up! 2022


Alternate cards

Hand-penned Petals Stamp Set + Penned Flowers Dies

 Hand-penned Petals Stamp Set + Penned Flowers Dies


I created the alternate cards shown above using the Hand-penned Petals Stamp Set and the coordinating dies.


PENNED FLOWERS DIES
Hand-penned Petals Stamp Set
Copyright Stampin' Up! 2022
  
Penned Flowers Dies
Copyright Stampin' Up! 2022

Techniques Used

  • Stamping
  • Creating a neutral background
  • Die Cutting
  • Coloring with Stampin' Blends
  • Strategically placing Dimensionals 
  • Coloring embellishments

Supplies Used

For a complete list of supplies used, and to shop the products for this project, go here: 

Video

Check out the video here for more details.  Included are several tips you can incorporate in your own crafting.


Monday, August 15, 2022

Potted Succulents Dies - Large Background Die

Did you know the Succulents Dies includes a gorgeous background die?  Imagine using it on all sorts of papers and cardstock (ie. basic cardstock, vellum, specialty papers, glimmer, foil, etc.).  The possibilities are endless.

Potted Succulents Dies
Images copyright Stampin' Up! 1999-2022

 This die set coordinates with the Simply Succulents Stamp Set for even more possibilities.

Simply Succulents Stamp Set
Images copyright Stampin' Up! 1999-2022

Here, I've used the Potted Succulents Dies (#154330 ) with Gold Foil (#132622) and paired it with a greeting from the Simply Succulents Stamp Set (#154480). 

Layer it over your favorite color of cardstock to really showcase the intricate details of the background die.  I've layered it over Calypso Coral Cardstock (#122925).

Potted Succulents Dies

Shop

To shop the products used for this project, go here:  POTTED SUCCULENTS DIES CARD

Wednesday, June 29, 2022

In The Moment Card

Here's a card made using the Gentle Waves Stamp Set and the In The Moment Stamp Set.

Techniques Used

  • Stamping
  • Die Cutting
  • Coloring with Stampin' Blends


Gentle Waves Stamp Set + In The Moment Stamp SetIn a previous post/video I created a portrait-oriented card using the Gentle Waves Stamp.  

When the stamped image was trimmed to fit this card, I was left with a strip that I incorporated in the card above by cutting it into two equal sized pieces.


The cardstock layers coordinate with the colors used on the stamped focal point image.  These colors were chosen by using the Color Coach for Balmy Blue.


Supplies Used

Stamps

  • Gentle Waves -- retiring this month!
  • In The Moment

Ink

  • Balmy Blue
  • Tuxedo Black

Cardstock / Paper

  • Basic White 
    • 2 1/2" x 4" for stamping focal point
    • 1 1/2" x 4" for stamping waves (cut in half to get 2 equal sized pieces)  Note- I used a leftover piece from another project
  • Night of Navy - 2 3/4" x 4 1/2" for die cut layer
  • Granny Apple Green - 3 1/4" x 4 1/2" for die cut layer
  • Crumb Cake  - 5 1/2" x 8 1/2" for card base

Tools

  • Color Coach
  • Stitched Rectangle Dies

 Embellishments

  • Elegant Faceted Gems

Adhesives

  • Stampin' Seal
  • Dimensionals

Shop

To shop the products used for this project, go here:  IN THE MOMENT CARD

Video

Check out the video here for more information on this project.


Tuesday, June 28, 2022

Gentle Waves Card #3

Here's a third card made using the Gentle Waves background stamp from the January-June Mini Catalog (2022).  This stamp set is only available through June 30th (or while supplies last).

This card takes the waves and turns them into sand!  It's super easy, but wow what a result!

The Gentle Waves Stamp Set is paired with the Paradise Palms Bundle for this project. 

Note-- the bundled discount price ends June 30th for the Paradise Palms Stamp Set and Dies!  After that, the items will still be available, but not as a discounted bundle!

Techniques Used

  • Stamping
  • Die Cutting
  • Coloring with Blending Brushes

Gentle Waves Stamp Set + Paradise Palms Bundle

Don't forget the inside of the card!
Gentle Waves Stamp Set + Paradise Palms Bundle

Supplies Used

Stamps

  • Gentle Waves -- retiring this month!
  • Paradise Palms Stamp Set -- bundled discount ends June 30th!

Ink

  • Balmy Blue
  • Crumb Cake
  • Granny Apple Green

Cardstock / Paper

  • Basic White 
    • 5 1/2" x 4 1/4" for stamping waves in Balmy Blue
    • 5 1/2" x 4 1/4" for stamping waves in Crumb Cake
    • 5 1/4" x 4" for inside of card
    • 5 1/2" x 8 1/2" for die cutting palm trees (3)
    • 2 3/4" x 1" for stamping and die cutting greeting
  • Crumb Cake  - 5 1/2" x 8 1/2" for card base

Tools

  • Color Coach
  • Palms Dies -- bundled discount ends June 30th!
  • Designer Tags Dies
  • Paper Snips Scissors

 Embellishments

  • Linen Thread

Adhesives

  • Stampin' Seal
  • Liquid Glue
  • Dimensionals

Shop

To shop the products used for this project, go here:  GENTLE WAVES CARD #3

Video

Check out the video here for more information on this project.